


Between kids’ activities, vacations, celebrations, and trying to savor all the little everyday moments, most moms have thousands of photos on their phones. It’s an overwhelming process to sort through them, figure out which ones to keep, and how to edit them.
It doesn’t have to be complicated, and thankfully, you don’t need expensive software or even a computer to get started. In a few simple steps, you can quickly organize, brighten, crop, and enhance your favorite photos so they look elevated and professional right from your phone.
Here’s a quick guide designed for busy moms who want an easy system to keep photos organized and looking beautiful on their device.
The Importance of Organizing Phone Photos
Generally, when we’re taking pictures on our phone, we’re with other people and trying to capture the moment so we can come back to it later and remember it. We typically don’t have the time to organize our favorites or edit them on the spot.
This often results in an overabundance of nearly identical photos. They take up space and aren’t necessarily our favorites, yet they remain on our phones simply because we haven’t had time to sort through them.
Here are a few best practices to help keep your phone images organized and your storage manageable. You can easily do this while waiting in the school pickup line or taking a quick break between tasks.
1. Create Albums in Your Photos App: Try organizing photos by relevance. For example, you might organize them by:
- Vacation location
- Each child
- Work-related images
- Family holidays or celebrations
This will save you valuable time scrolling through thousands of photos when you’re looking for something specific. Simply select the photos and move them into the appropriate album.
2. Select Your Favorite Images: Mark your favorite photos so they are easy to find later. These are likely the images you will want to edit, print, or revisit most often. Many phone photo apps allow you to “favorite” or “heart” images, making them easy to access in one place.
3. Delete Duplicate Photos: Deleting photos can feel scary, but it’s freeing once you start. Chances are you already selected your favorite version of that moment, and the other ten nearly identical images aren’t necessary. Removing duplicates helps free up storage and makes your photo library much easier to navigate. Once they’re gone, you likely won’t miss them at all.
How Busy Moms Can Edit Photos on Their Phone in Just a Few Minutes
Why Simple Photo Editing Makes Such a Big Difference
Even great photos straight from your camera can benefit from a few small adjustments. A quick edit can:
- Brighten dark photos
- Fix color that doesn’t look natural
- Straighten a crooked horizon
- Make your child’s face the focus of the image
Most edits take less than 30 seconds, and once you learn the process, it becomes second nature.
What are the Best Editing Apps on a Phone?
There are many photo editing apps available, but which one is the best?
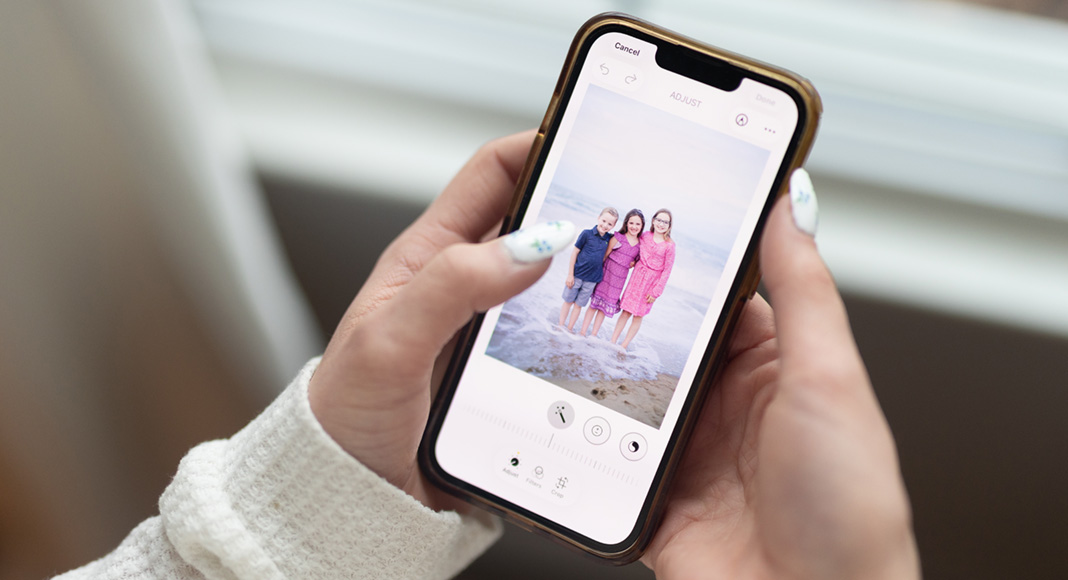
- Apple: Photos, Android: Google Photos: The photo-editing software in your phone’s preinstalled photo app is the easiest way to start. You truly don’t need anything fancy.
- Adobe Lightroom Mobile: If you’re looking for slightly more enhancement features, Lightroom is a great upgrade from your default photo app. It gives you more options than the basics that come with your device.
- Snapseed: This is a favorite for quick fixes. It’s great for brightening faces and removing clutter or small distractions.
- VSCO: If you’re looking for a specific style, such as soft and glowy, VSCO has beautiful filters that work well for family photos. Keep in mind that you should still make some basic edits before adding filters to achieve a high-end result.
For most moms, the photo app that comes with your phone is more than enough to create beautiful edits.
A Simple Process of How to Edit Photos on Your Phone
When you open your photo in your editing app, follow these steps.
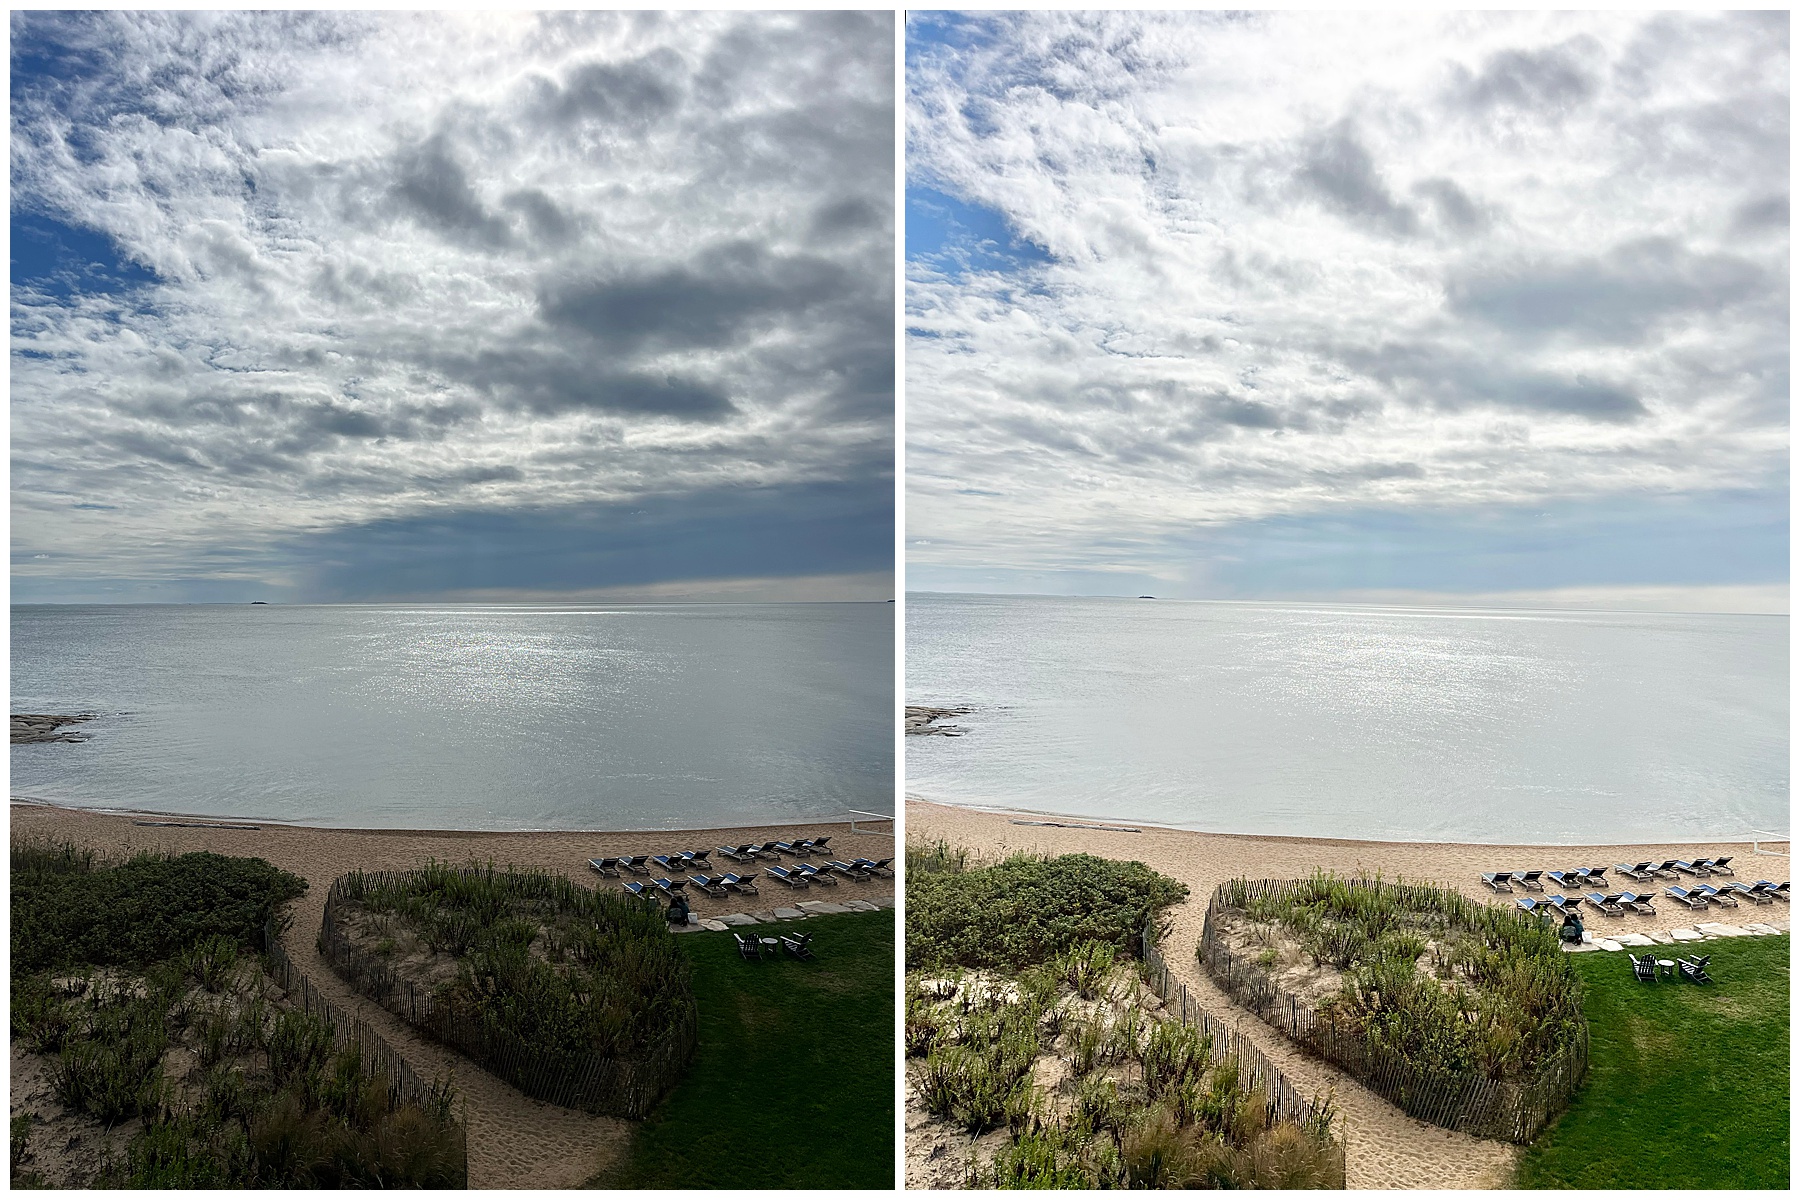
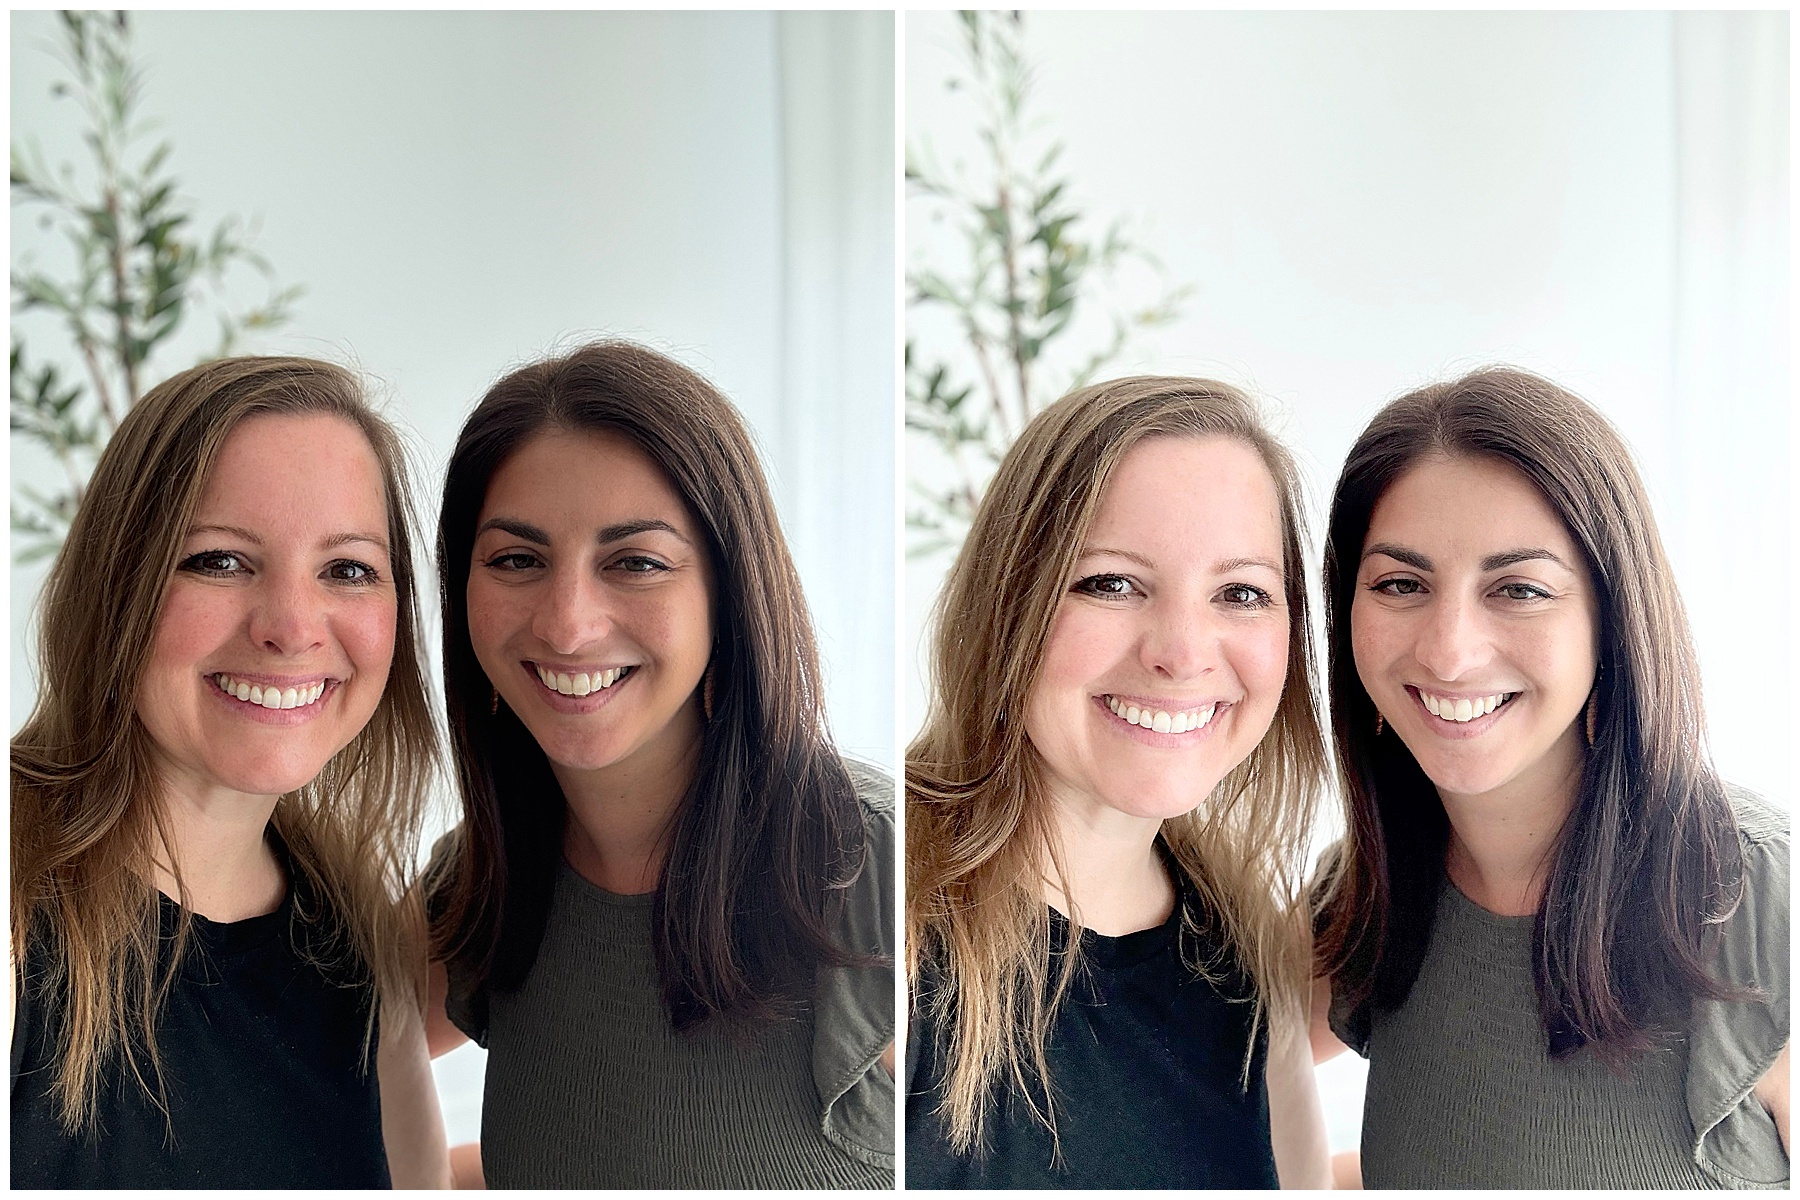
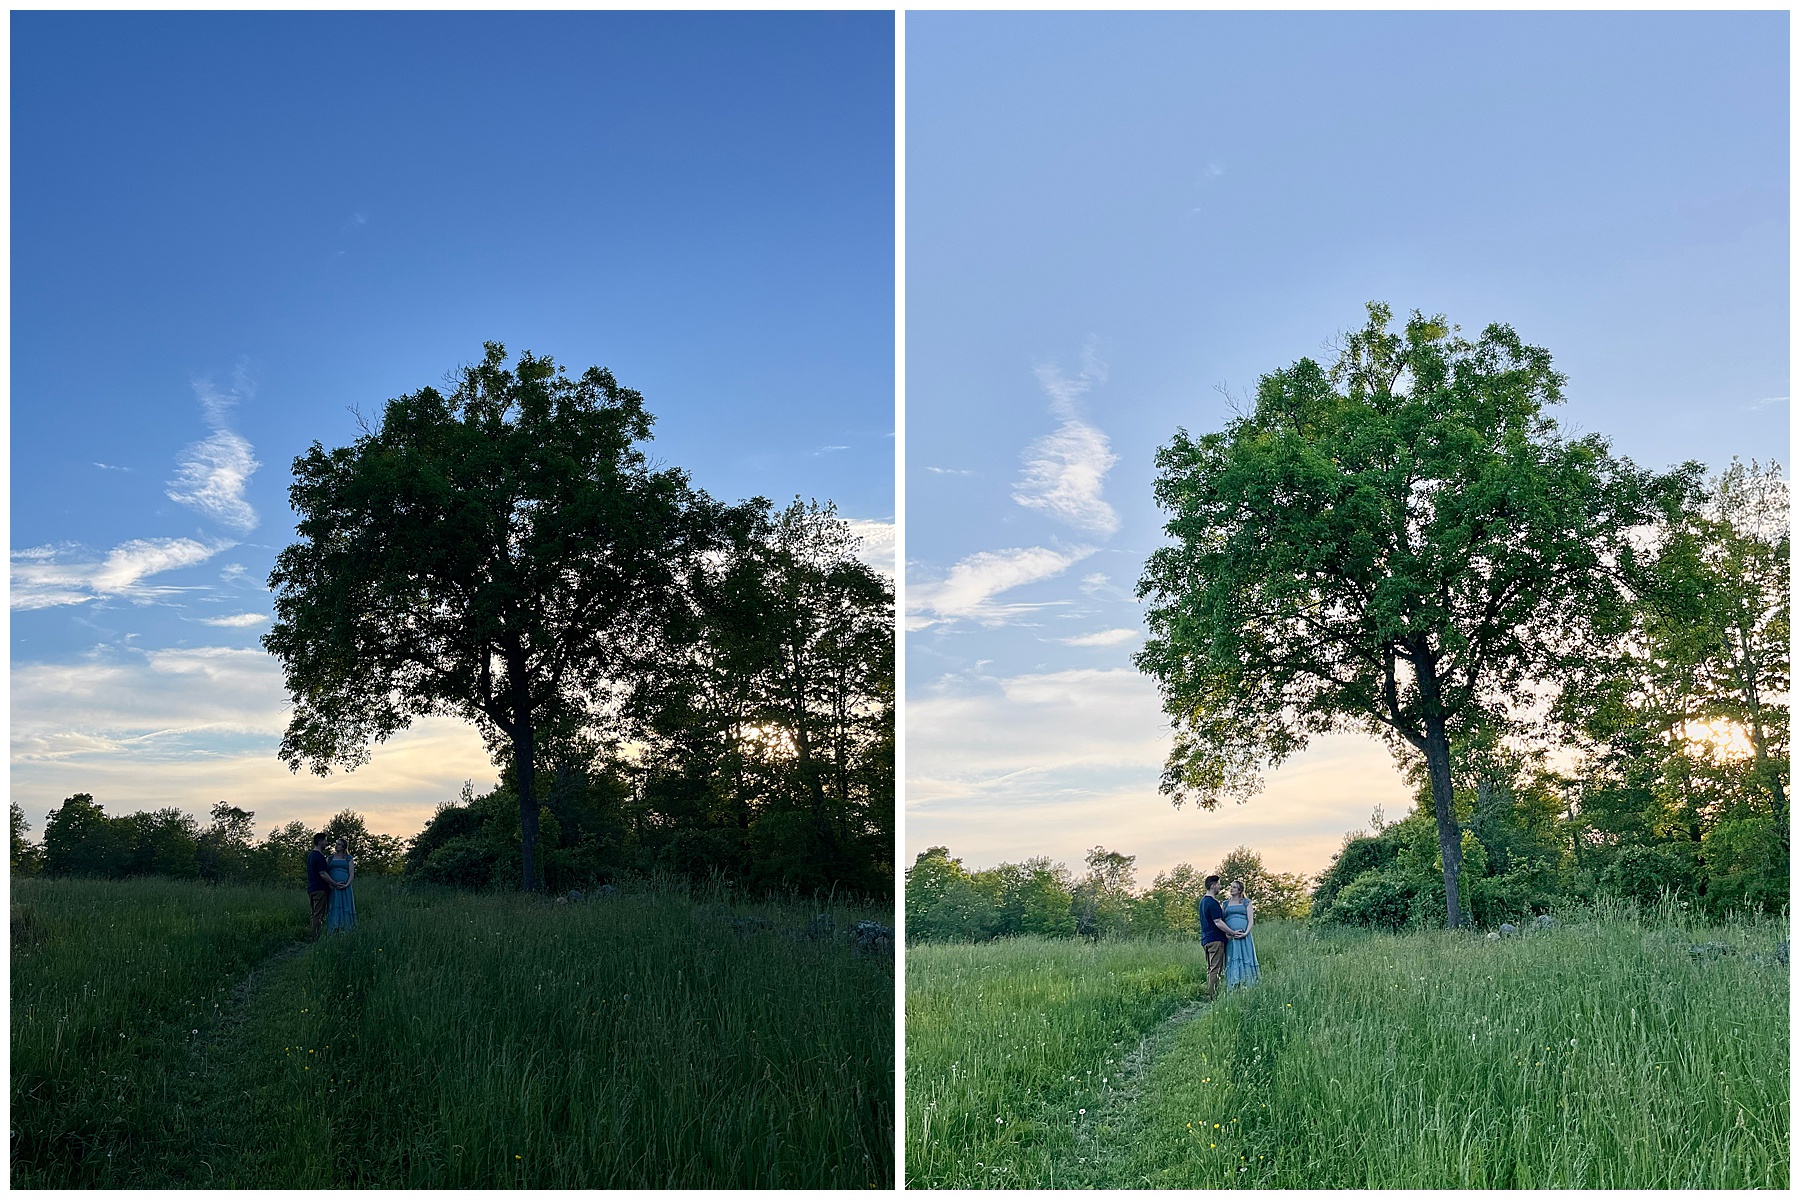
1. Brighten the Image: Increase the exposure or brightness slightly so faces are clear and well-lit. For darker images, you may need to adjust the brightness all the way.
Tip: Stop before the image looks overexposed. Check the highlights or white areas to make sure it’s not completely washed out.
2. Bring up the Shadows: If your image still looks too dark, you may want to bring up the shadows. This will help brighten faces and even out the tone.
3. Cropping and Composition: Cropping is one of the biggest improvements you can make. This detail often goes unnoticed, but it will make your image stand out from the rest to a trained eye.
Recommended:
- Straightening horizons for outdoor photos, notice crooked lines near architecture
- Crop out cars or unwanted distractions that make the photo too busy
- Use the rule of thirds to off-center an image to make it more visually interesting
4. Adjust the Temperature: If your photo looks very yellow (common indoors), lower the temperature slightly so skin tones look more natural. If it looks blue or cold, warm it up just a bit.
5. Increase Contrast Slightly: A small contrast boost will make the blacks darker and the whites brighter. Just a little goes a long way.
6. Add a Touch of Clarity: Clarity or texture helps bring out detail and sharpens the overall image. Keep it subtle so the photo still feels soft and lifelike.
Editing Tips That Make People Look Better
Here are a few quick tricks that make a big difference when photographing your family and friends.
1. Brighten faces first: Sometimes faces fall into the shadows. Brightening the image slightly helps bring focus back to them. You may need to pull up the shadows as well.
2. Avoid heavy filters: Filters can make skin tones look unnatural. Soft, subtle edits usually look the most timeless.
3. Keep colors natural: Bright, overly saturated colors can make photos look less professional.
4. Save your favorite edits: Many apps allow you to copy settings from one photo and paste them onto others. This is a huge time saver.


